How to Blur Faces in YouTube Video Editor
Whether you’re working around permissions, or simply want to be the sole star of your video, here’s how to blur faces in YouTube videos!
Have you ever watched a true crime documentary, or the evening news? Then you’ll have seen plenty of blurred out faces. The most common reason for this editorial smudging is to protect the identities of people featuring in programmes or videos. This could be in the name of their safety, or it could be a way of saving yourself a load of paperwork. In many cases, any person who features in a film, programme or video will need to sign a release form. This gives you permission to use their image within your work.
But what happens if there are hundreds of strangers’ faces in your video? Ain’t nobody got time for that.
Fortunately, learning how to blur faces doesn’t require any fancy, expensive software or heaps of expertise. In fact, you can blur faces on YouTube directly, via the Editor tool in YouTube Studio. Allow us to walk you through it!
How to Blur Face in YouTube’s Editor

- Sign in to YouTube Studio.
- From the left-hand menu, select Content.
- Click the video that you’d like to edit.
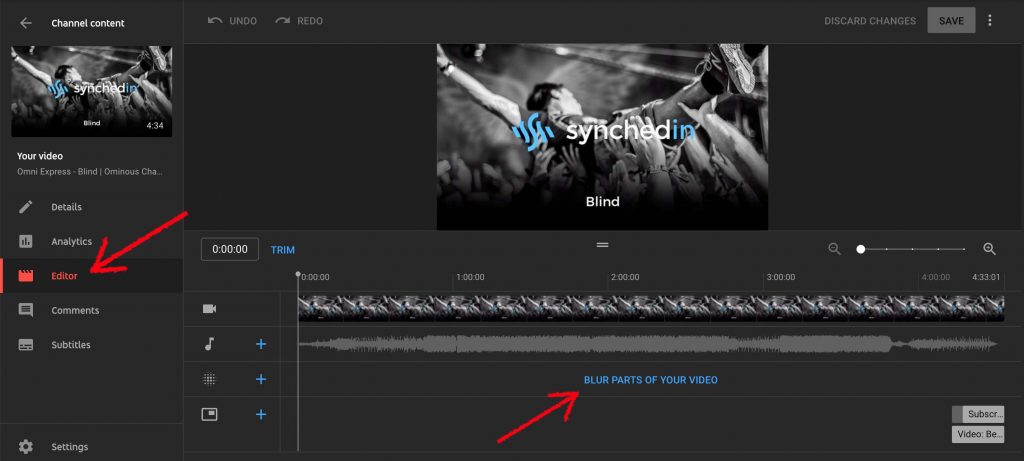
- From the left-hand menu, click Editor.
- Click BLUR PARTS OF YOUR VIDEO and select Face blur.
- Once processing is complete, select the faces that you’d like to blur, then click Apply.
- Click and drag the box to adjust the blur.
- Click Save.
This super straightforward method relies on the automatic detection of faces within the video. Since it’s a relatively accessible and basic way of blurring faces, you can’t expect mega sophisticated editing options here. However, you can take matters slightly more into your own hands with the custom blur tool.
- From the left-hand menu, select Content.
- Click the video that you’d like to edit.
- From the left-hand menu, click Editor.
- Click BLUR PARTS OF YOUR VIDEO and select Custom blur.
- Click and drag the box to adjust the blur.
- Hit Save.
You can choose to have the blurred area track an object, or you can fix the blur in position, so it doesn’t move at all. In order to control when the blur happens, click and drag the ends of the timeline to set when the blurring begins and ends.
Once you’ve nailed the blurring, don’t forget to add music to your video.
Videos with great music are more likely to increase views, pull in subscribers, and boost your following. Who doesn’t want to earn money through their YouTube videos? Well, that’s the way to do it!
Synchedin offers a huge library of awesome royalty free music, all with the sync license covered. For a subscription of just $4.99 per month, you can access unlimited downloads of a varied and ever-growing library. What are you waiting for? Sign up today!
